|
|
|
|
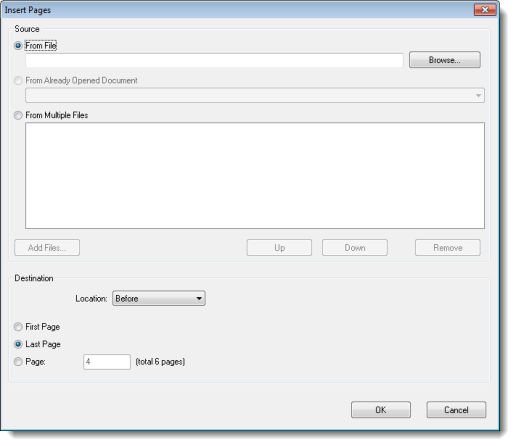
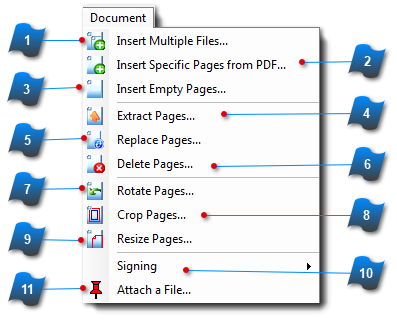
Launches the dialog box to insert pages into the current document from other files.
-
Pages can be inserted from a single file or from several files at once.
-
All pages in the selected files will be added to the current document.
-
Select where in the current document to insert the pages.
| |
|
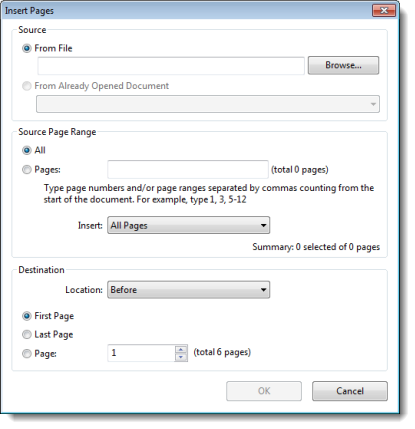
Launches the dialog box to insert selected pages from one document into the current document.
-
Browse for the file that contains the desired pages.
-
Pages can be inserted from another document already open. Select the document from the dropdown list.
-
Select the pages to be inserted. Type in a page range or individual page numbers. From the dropdown list select to insert all of pages, just the odd pages or just the even pages.
-
Select where in the current document to insert the pages.
| |
|
Launches a dialog box to insert blank, empty pages. These pages can be used to insert attachments, notes, markups or signatures along with other actions as well.
-
Select the size of the page to insert from the dropdown list or create a custom size.
-
Choose either portrait or landscape orientation.
-
Select how many pages to insert.
-
Select where in the current document to insert the pages.
| |
|
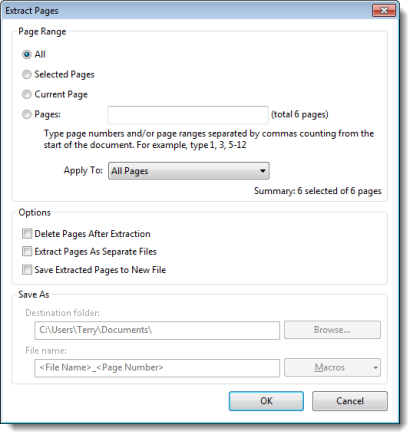
Launches the dialog box to extract pages from the active document.
-
Select which pages to extract.
-
Choose what to do with the extracted pages - Delete them, save each page to a separate file, or save all the extracted pages into one new file.
-
Extracted pages can be deleted from the active document and saved into one of the new formats at the same time.
-
If new files are being created, then select the new file location and naming method.
| |
|
Launches the Windows Explorer file browser for selecting the file that contains the replacement pages.
-
With the new file selected the Replace Pages dialog box prompts for the page(s) that will be replaced and the page(s) in the new file to replace it with.
-
You may replace a range of pages with the same amount of pages from the new file.
| |
|
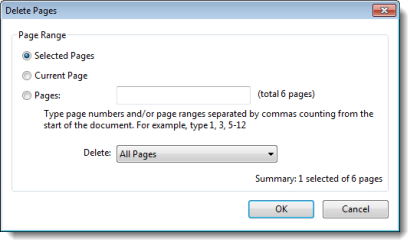
Launches the dialog box to help Delete multiple pages at once.
To Delete a single page, select the page from the Pages pane or the Bookmark pane and press the Delete key, or choose Delete from the Edit menu, or select Current Page from this Delete Pages dialog box.
To Delete multiple pages at once, enter the page range or select from the dropdown list.
| |
|
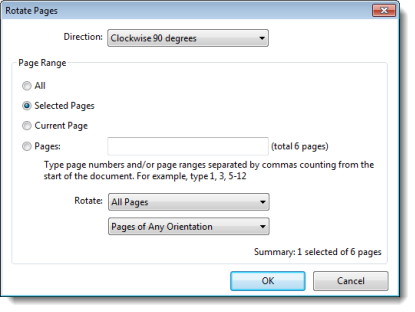
Launches the dialog box for Rotating Pages. Pages saved using this function will be saved with the new rotation.
-
Select the Direction of rotation from the dropdown list.
-
Choose the page range to rotate.
-
Pages can easily be rotated based on their existing orientation.
| |
|
Launches the dialog box for cropping pages.
Use the Crop Box to visually select an area of the page to clip to.
Move the handles in the work area to the desired region to be displayed.
About Box Types:
A PDF describes the content and appearance of one or more pages. There can be up to 5 different descriptions in a PDF that relate to its page size. These are called the page boxes:
-
The Crop Box defines the region to which the page contents are to be clipped.
-
The Bleed Box determines the region to which the page contents needs to be clipped when output in a production environment.
-
The Trim Box defines the intended dimensions of the finished page.
-
The Art Box can define a region within a page that is of special interest.
-
The Media Box (not used here) is used to specify the width and height of the page. (Actual Page Size)
| |
|
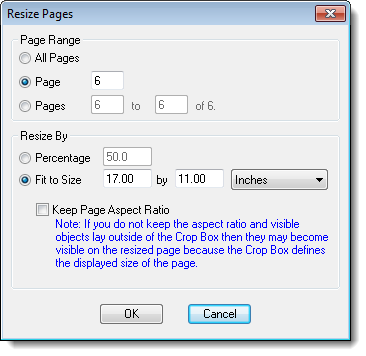
Launches the Resize Pages dialog box.
-
Individual pages or a range of pages can be resized.
-
Resize by a percentage amount or type in exact dimensions.
-
Option to Keep Page Aspect Ratio. (see Note below the check box)
-
The drawing will be scaled according to the new page size.
| |
|
Displays the sub-menu for Signing the active document.
| |
|
Starts the process of attaching a file to the page.
| |
|
|
|
|
